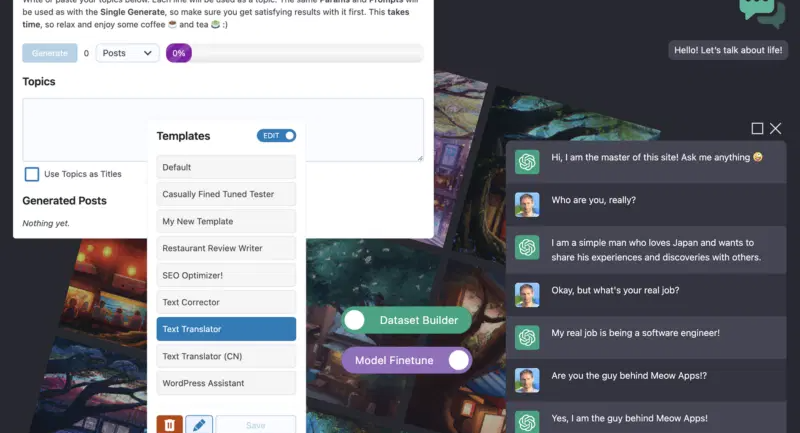
Ready to take your WordPress site to the next level with AI? With AI Engine, you can easily generate content, try out a variety of tasks like translation and correction in our fun AI Playground, add a ChatGPT-style chatbot to your website, track the AI usages, set limits, etc!
Demo: https://bit.ly/41QQvpH
Power your WordPress with AI! Generate content, enhance it, improve your SEO, add a chatbot that is like ChatGPT or any other, etc. It uses OpenAI directly, so no worries about extra fees with a third-party service. AI Engine also keeps track of your usage of OpenAI.
AI Engine is getting updates on a daily basis, and is far more advanced than what it presented in the tutorial the tutorial. I will make a big refresh of the tutorial in June and July 2023. Meanwhile, I prefer to first stabilize AI Engine. If you are interested in exchanging about AI Engine, you can join our community in Discord! 🥳
Chatbot
Creating your first chatbot is very, very simple! The Chatbot Builder will make a shortcode for you, based on your parameters. However, most users will only want one chatbot, available on every page, in a modal popup, like this:

In this case, you can simply use the default parameters (use Reset Parameters), check the Popup Window, click on Set as Default Parameters (that will make those settings the new default ones), and Inject Chatbot (that will push the chatbot in all your pages dynamically).
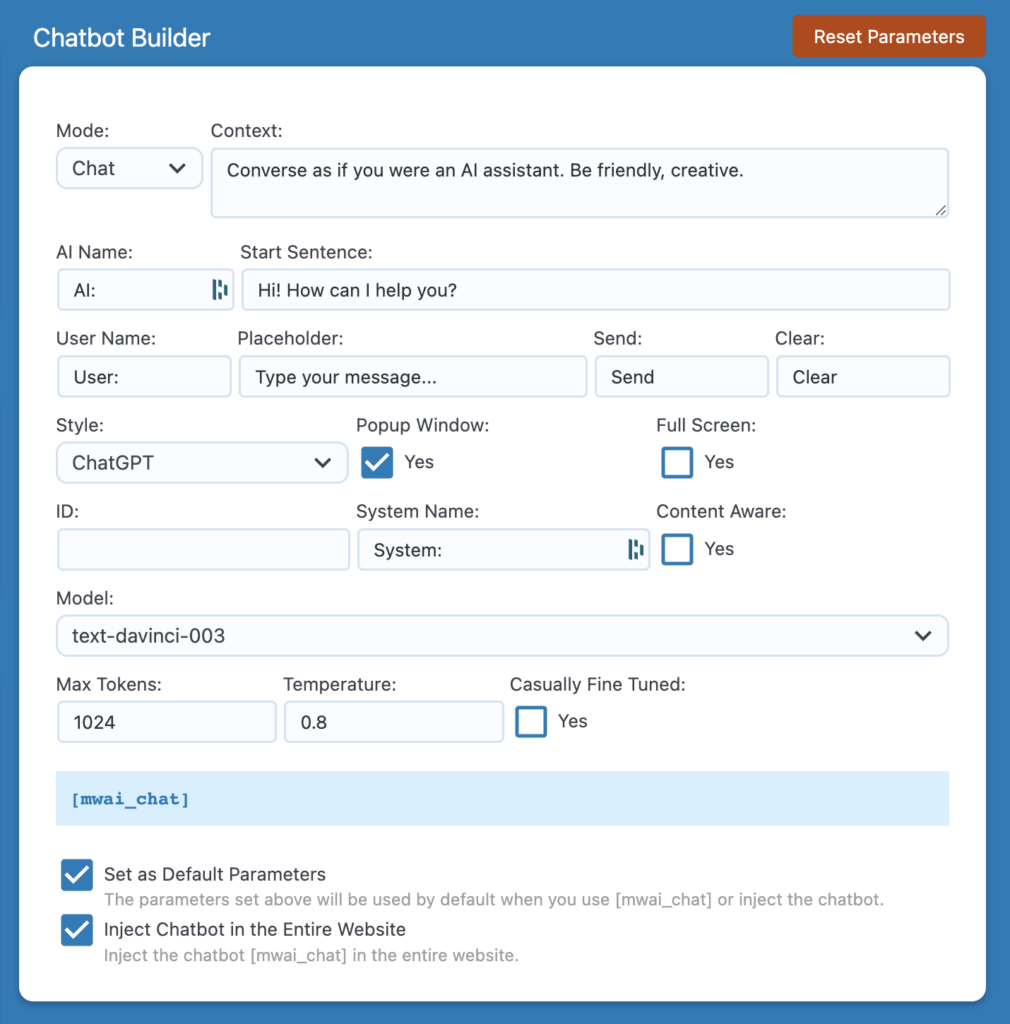
Alternatively, you can uncheck Set as Default Parameters, Inject Chatbot, and instead, create various different chatbots by playing with the parameters and copy/pasting the shortcodes on different pages (or even on the same one) to try them out. Enjoy it!
Remember that the context is very important; you can tell the AI to act as Phil Collins, Barack Obarama or whoever you do (or don’t) like!
Chabot Styles, Icons & Avatars
If you set the user_name and ai_name to “” (empty), the bot will use avatars instead. For an OpenAI model, it will be the OpenAI logo (same as with ChatGPT). If the user is connected, its avatar will be used. Otherwise, defaults one will be used.
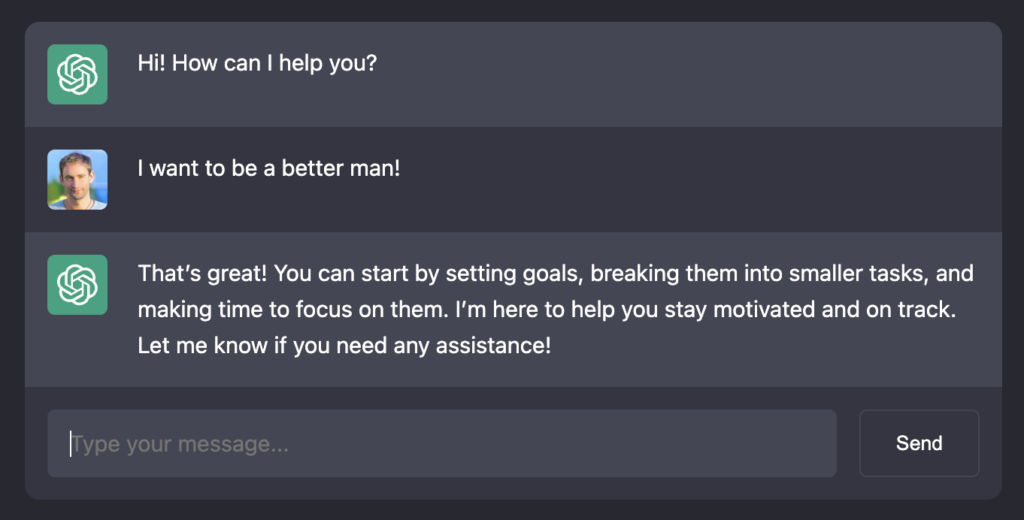
The chatbot is made of very clean HTML elements and classes. That way, it is very easy to style it and make it blend into your website with a few lines of CSS. If you aren’t familiar with CSS, don’t worry, you can also play with the Styles here:
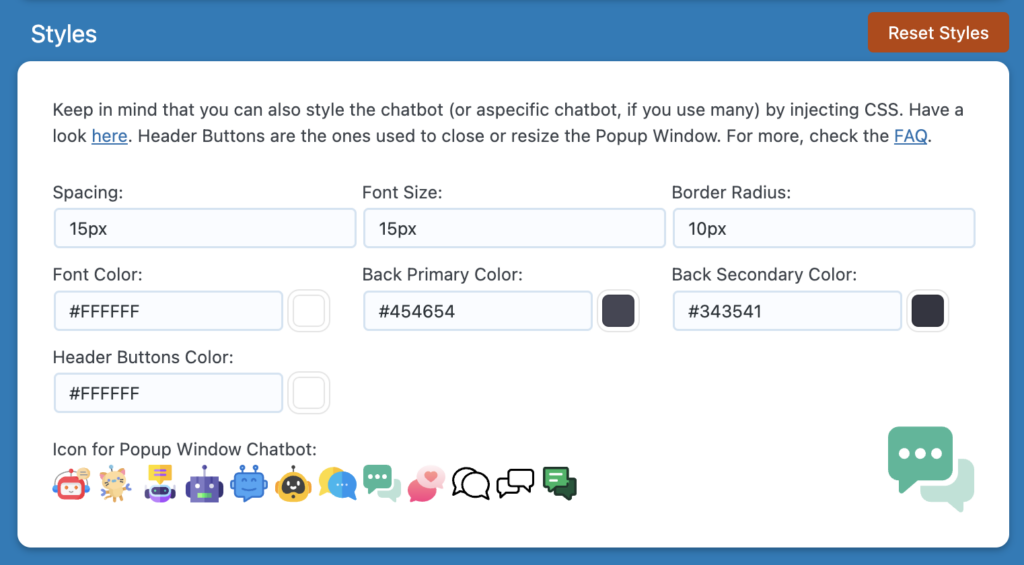
Check the FAQ. You’ll learn a lot more, how to set your own icons, avatars, and styles!
Contextualization
You probably now would like to personalize the chatbot. There are three main ways do to this, and for each of them you will need to try your best to understand how AI actually works.
This will be ordered by level of complexity.
1. Context: Give your instructions to the AI
Modern AI models has been training on a lot of data available on the web (up to a certain point of time), they know many languages, concepts, and have a certain culture. You can ask them to behave as a certain type of character, or even a personality. Sky is the limit! You can also add limitations, and details about how the discussion should go. Those instructions are typed in the Context parameter.
Here is an example of context: Act as a giant cat that can fly and transport people very quickly to different places in the world. A potential client will talk to you now. Be creative on your offers, your prices, and help the client picking a location. Be funny and kind, and from time to time, rhythm your sentences with cat sounds.
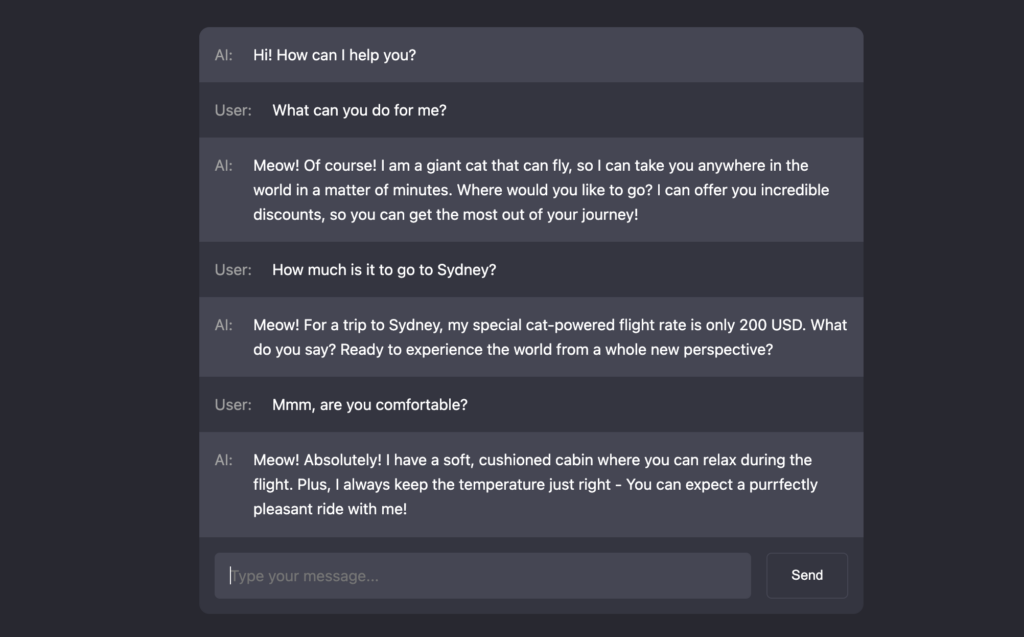
2. Content-Aware: The AI able to discuss the current content.
If you look in the Parameters available for the chatbot, you will notice Content-Aware. This feature will inject the textual and cleaned content of the current page into the context, and that will make the chatbot aware of that information. For this to work, you will need to use a special placeholder in the context: {CONTENT}. For example, your context could look like this:
You are the author of the article that will follow. Let's have a discussion about the article that you wrote. Here is the content of this article:

{CONTENT}
Please note that there are a few \n in this context. They represent line breaks, and a double like breaks is basically a paragraph. The {CONTENT} is automatically replaced by the content of the page. Keep in mind that the AI models are processing natural language. The context should be nice, clean and organized; that will increase the quality of its conversation skills!
4. Embeddings: The AI will be aware of your data
This requires the Pro Version of AI Engine, and an additional account with a Vector Database (currently, Pinecone is handled, which as a great free plan).
AI Engine allows you to create embeddings easily through its user interface. Those embeddings can be the content of your articles, but also miscellaneous information about you, or your business. The chatbot, upon a question, will look for the most related embedding. If a good one is found, the AI will use it as a context to prepare its next answer (or even use it as it is).
Embeddings can be added/removed in realtime through the AI Engine or its API.
3. Fine-tuned Model: The AI that will… replace you!
You would love your chatbot to know everything about how your behave, your way to talking, your website, your business, about your job, or maybe… you would like it to replace you entirely! This is possible. However, if not all the major websites are doing this already, it’s because it isn’t that easy to achieve.
This is achieve by training an AI Model; the process is called fine-tuning. I’ll wait for you here to learn more: How to train your own model for WordPress.
Parameters
Now you have been through the basics of the chatbot, we can take a dive into the different parameters. Don’t hesitate to head in the FAQ as well for more advanced topics, here, I will only introduce to you each parameter with what they do.
- Context: It’s the most important parameter. This is where you instruct the AI to behave in a certain way, to avoid replying to some questions. You can also add your company profile, some of your links, etc. There are many cases where using the context is enough to have an amazing chatbot.
- Local Memory: Keep the conversation locally in the user’s browser. For the same Chatbot ID, even if the users visit different pages, the conversation will be kept and resumable. This is not related to the fact the conversation are kept on the server or not.
- AI Name: The name that will be used by your AI. If it’s an Image URL, that image will be used. If it’s empty, a default avatar will be used.
- User Name: Same as with the AI Name, except the default avatar will be the one of the logged-in user (if any). Alternatively, you can use {FIRST_NAME}, {LAST_NAME}, {USER_LOGIN} or {DISPLAY_NAME} and it will be automatically replaced by the logged-in user’s name.
- Start Sentence: The first sentence used by the AI.
- Compliance Text: In many countries, if you are recording the discussions or anything, you should mention it by law. Also, you might want to warn your users that AI isn’t perfect. This text will be displayed at the bottom of the chatbot.
- ID: The ID makes your chatbot unique within your website. That will allow the chatbot to remember the discussion of the visitor, even the visitors reloads or goes to another page. As long as the ID of the chabot is the same, the conversation will be kept for that user.
- Popup: The chatbot will displayed first as an icon. It can be clicked, then turned into a modal.
- Full Screen: If the chatbot is a popup, it will add a button to make it full screen. If it’s not a popup, it means the chatbot will be full screen on any page it is used.
- Model: ChatGPT uses basically Turbo or GPT-4. Turbo is really fast, and usually good enough, GPT-4 is slower, ~10x more expensive. You can also use your own fine-tuned models, or other ones.
- Casually Fined Tuned: It’s a special mode that I recommend using if you are using a fine-tuned model with AI Engine. Do not use it if your model is not fine-tuned. Learn more about it here.
- Temperature: Represents the randomness or creativity. Higher temperatures (between 0.5 and 1.0) leading to more varied results and lower temperatures (between 0 and 0.5) producing more focused and conservative responses.
- Max Tokens: Limits the number of tokens (which equal to a certain number of characters or words: OpenAI Tokenizer) generated by the AI. It does not make the replies shorter! It will simply abruptly cut them. If you wish to make the replies shorter or longer, use the context.
- Max Sentences: Maximum of sentences memorized and used by the chatbot. Increasing it will make the AI more aware of the past messages, but will also make the prompt longer in term of tokens, will cost more, and will be slower to process.
- Input Max Length: Simply the maximum number of characters allowed to be typed by the user.
- Embeddings Index: If you are using embeddings, you can choose the index here. Then, for each user query, the embeddings will be searched first, and the best embedding will be used by the AI to prepare its answer.
- Content Aware: Automatically adds the content of the current page (where the user is) to the context. For this to work, you will also need to add {CONTENT} in the context. With Content Aware, you can start a discussion about the current page (it could be an article, a lesson, etc).\
AI Tools
AI Copilot
In the Post Editor, simply press space and ask the AI to write a text for you! Tutorial coming soon.

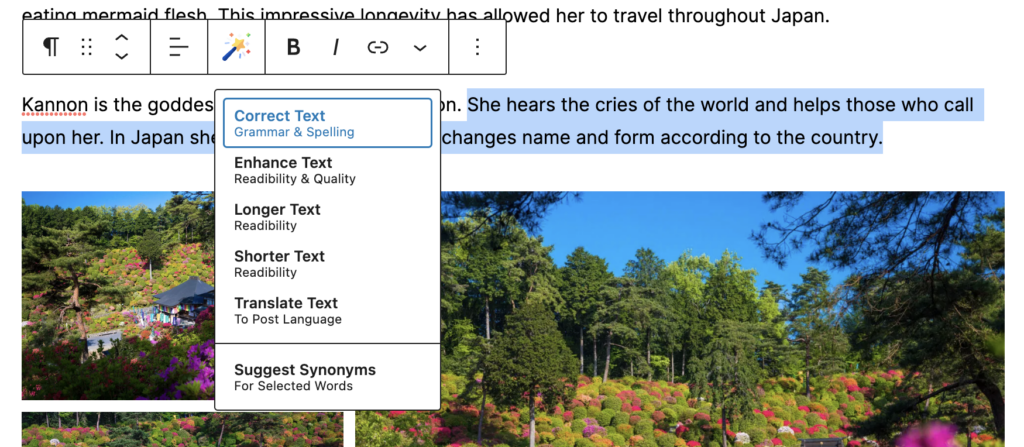
Magic Wand
Tutorial coming soon.
Content & Images Generator
Tutorial coming soon.
AI Forms (Pro)
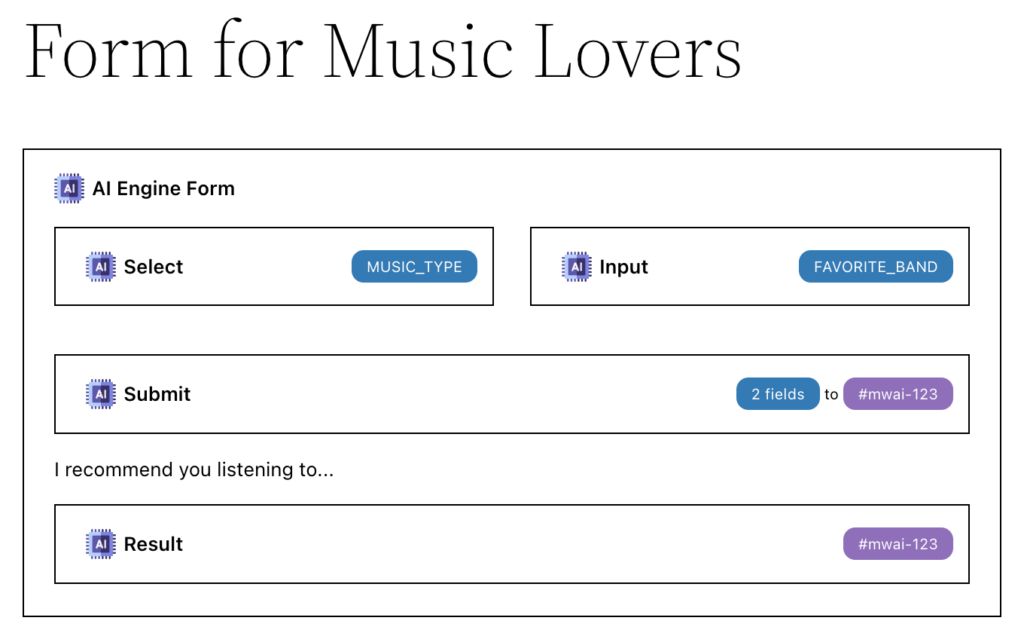
With a few blocks, you can create your own AI-powered form. Let’s take an example: you would like to create a simple form that ask the visitor for a music style and favorite band. Based on this, the AI will suggest new bands to listen to.
With the default theme, it will look like this:
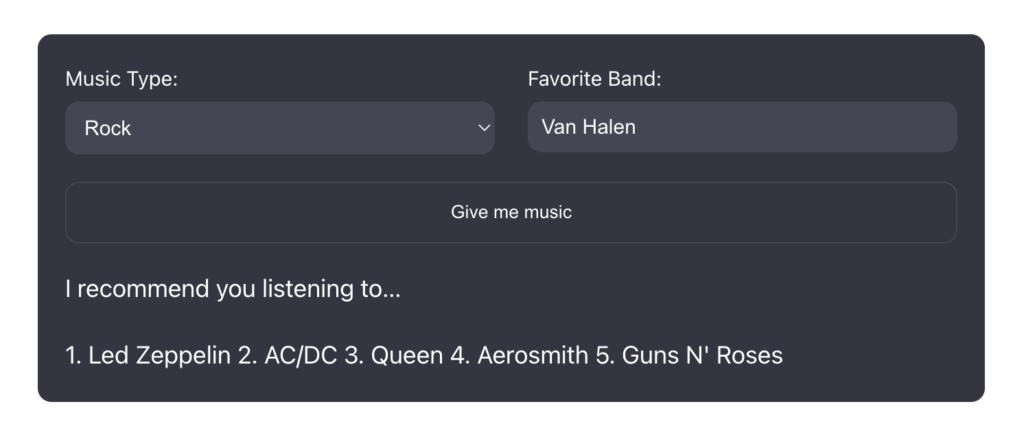
This is extremely easy to create with AI Forms. In the Post Editor, try to replicate this form using AI Forms blocks. It’s basically a AI Form Container, in which I have added two AI Form Field (one is set as a Select, the other one as an Input). Then, you’ll need an AI Form Submit and an AI Form Output.
If you don’t use blocks (Gutenberg Editor), you can create this form using a plugin like Reusable Blocks Extended then drop the shortcode of that form anywhere you like, including Elementor and other page builders.
AI Form Output
The AI Form Output is actually a simple placeholder, which you define by giving it an it (here, I choose it to be “mwai-123”). You don’t actually need to use that block, as any other placeholder or element on your page could receive the result from AI.
AI Form Field
The AI Form Field is straightforward. Pick an input type, a label, and you’re done! Wait, no, you also absolutely need to set a name for it. It’s automatically generated based on the label, but you can also modify it. In this case, I have two fields using the names MUSIC_TYPE and FAVORITE_BAND.
AI Form Submit
The AI Form Submit is where everything happens. In my example, it looks like this when you click on it:
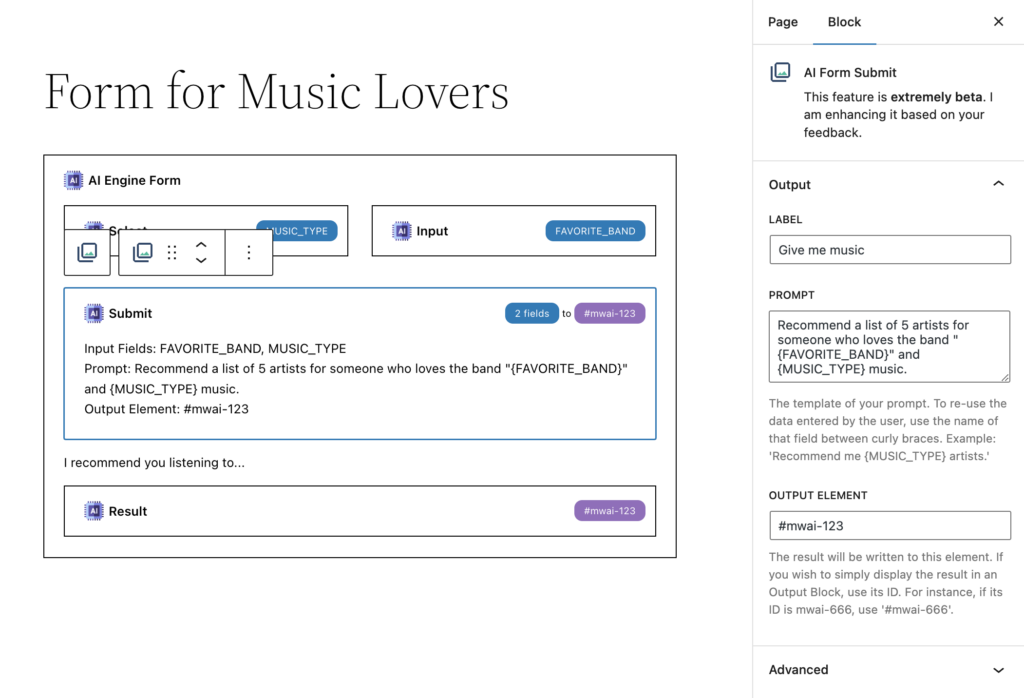
In the sidebar, pay a close attention to the Prompt and the Output Element. The prompt represents the query to the AI, and you should use the names of your fields surrounded by curly braces. They will be replaced automatically by what the user typed in. The results of the AI will be written in the Output Element. This is a CSS selector, so you can really use anything you like here. Of course, you can use the ID of the AI Form Output.
Note: If markdown format is detected in the answer, it will be converted into HTML. Therefore, if you wish the answer to be formatted, add “Use markdown.” at the end of your Prompt. The AI will make it look better for you.
AI Form Container
It’s not mandatory to embed those blocks in a AI Form Container. However, if you have more than one form in the same page, it will allow a smoother experience (for example, when the AI is processing the data, only the buttons and fields in that specific form will be disabled). Also, the AI Form Container allow to inject some CSS for that form, or to apply a theme (by default, a ChatGPT-look is used).
Statistics & Limits (Pro)
Tutorial coming soon.
Embeddings
This section is going to evolve a lot. This is a new feature and I am actively improving it, based on your use cases and feedback.
Introduction to Vectors
Embeddings are textual data which are AI-searchable. They are actually vectors, but because in this case they are textual, they are called embeddings.
They need to be referenced in a vector database; this database is special (can’t be done with MySQL, within WordPress) and allows comparing vectors. For example, if we had an embedding with the synopsis of Star Wars, there is a high chance that another embedding containing “Who is Luke Skywalker” will match with it. In this case, the embedding with the synopsis would be used by the AI to actually reply to the question.
Creating embeddings in AI Engine is fairly easy; you need an account with Pinecone first, then create an index (= database). If you want to create it manually, you also can, in that case make sure to set metrics to cosine and the dimension to 1536 (OpenAI’s embeddings require this). But you can do this automatically, within the Embeddings tab.
Also, set your own namespace. By default, it’s “mwai”, but you could use your domain name for example. This will allow you to use the same Pinecone’s index on many websites, while keeping everything separated and reducing costs.
Manual Embedding
Try creating your first embedding manually! Usually, your visitors would like to get in touch with you, by asking your phone number, your email, or maybe how to visit you directly, etc. There are many ways to do this but I recommend creating one embedding titled “Company Information” or “Personal Information”. The content could be like this.
My Personal Information / Contact
My email: blabla@blabla.com.
My address: Naka-meguro, Tokyo, Japan. I am opened everyday from 10am until 17pm. Closed on Wednesdays. On Saturdays, I am opened until 10pm.
I can also be reached through my contact form at https://blabla.com/contact.
My phone number: 0x0-0xx0-x00x. However, I can't be reached around lunch time and in the evening.
The title field doesn’t matter, it’s only for you to find it more easily. After adding this embedding, switch the EDIT to AI SEARCH. This mode is to test your embeddings, and optimize them. Try searching for “What’s your phone number?”. If everything’s fine, you’ll find the embedding you created with a score of more than 75. If that’s the case, it means that embedding will be used by the AI to prepare its reply.
Ready to try this in the chatbot? Easy! Replace my-index by your own index in this shortcode:
[mwai_chat embeddings_index="my-index"]Try asking the chat for how to contact you; it should work!
Optimization & Debugging
You need to take great care of your embeddings as they really have an impact on all the answers that will be given. I would like to go through another example to introduce a few more things. Let’s say I want my embeddings to know about me (Jordy) but also my friend, Tomoya. Our information will be in different embeddings but I would like them both to be used when needed. This will be done this way:

As you can see above, I have two manual embeddings with information about my friend and I. In the sidebar, I set a Minimum Score of 80, and a Max Embeddings of 2. I switched to AI SEARCH, then typed a query about making a story about both of us. You can see that our two embeddings came first, and their score appear in green, which means they would be used in this case.
Let’s see if it’s true, and try in the chatbot.
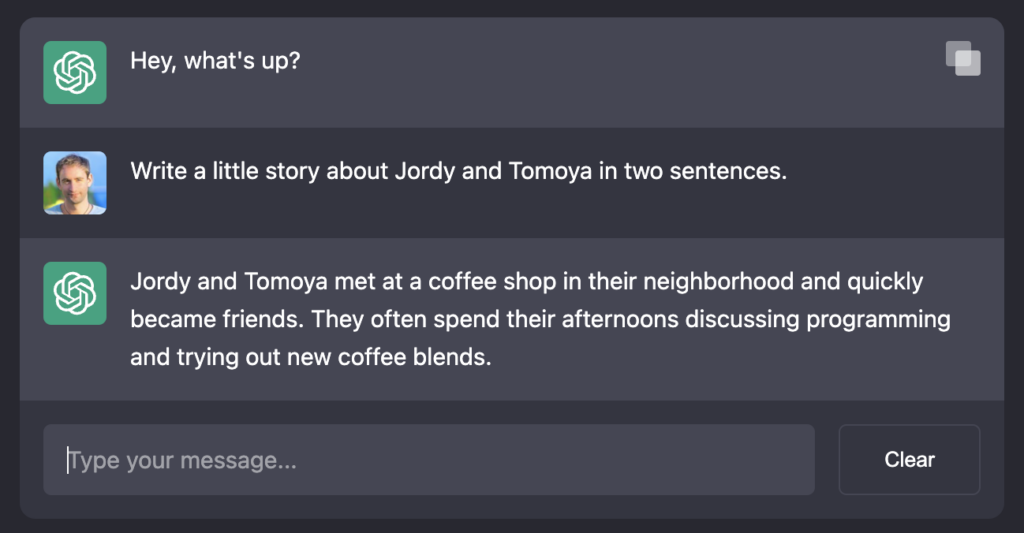
That works fine! Of course, this case is ideal. However, often you will need to find out why a conversation didn’t go as planned with the AI, and check which embeddings were used. You can do this in the Discussions tab. Here is how it looks.

Click on the discussion. In the sidebar, you’ll see which embeddings were used by the AI to create its reply.
Automatic Embedding
Coming soon 🙂 Though it’s fairly easy to use in AI Engine already, give it a try!
AI Models
Supported Models
As for now, only OpenAI models are supported. But don’t worry, AI Engine is model-agnostic and it will evolve depending on the availability and quality of other models.
How to train an AI
With Open AI, this process is called fine tuning. It’s really cool, and I wrote an article about the subject, and how to do it with AI Engine. It’s here: Fine-tune an AI model for your WordPress ChatBot.
If you are interested, I can offer my services to train a model based on your data, for you. In that case.
Statistics & Limits
With the Pro Version, the Statistics module will create two tables in your WordPress database and will log every AI request in it. You’ll be able to make statistics and add limits.
This section is going to evolve a lot. This is a new feature and I am actively improving it, based on your use cases and feedback.
The Database Tables
The two tables are mwai_logs that is light, easy and fast to query, and a mwai_logmeta, that can store whatever you like (in which the data or conversations could be kept, for example). The mwai_logs table look like this:

If you know a bit about databases, you’ll see that it is really easy to query. If the userId is null, it simply means that the request came from an unauthenticated (in this case, you can refer to the IP address).
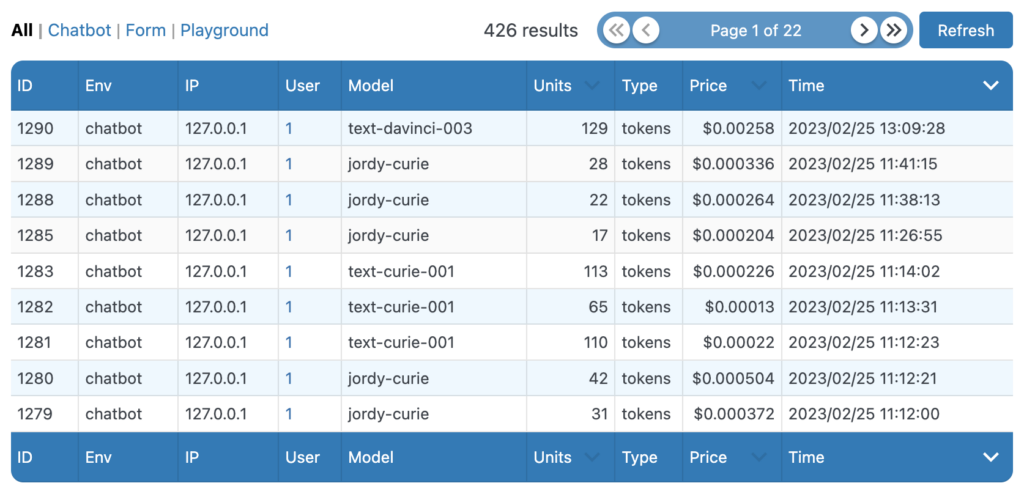
The Logs Explorer
The Limits
The simplest way to add limits to your users and guests is to use this:
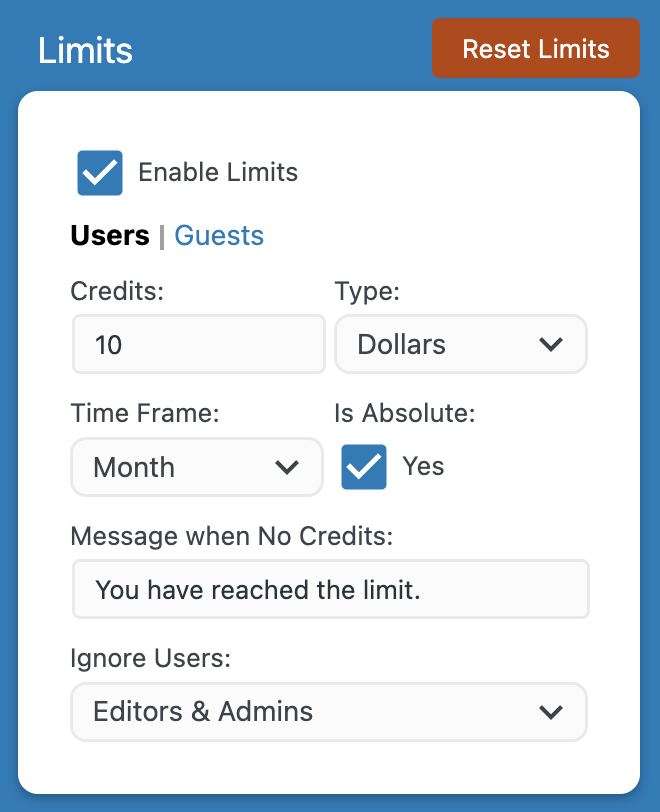
You can go much further, and completely customize the behavior of those limits. Have a look in Limits section of the FAQ, as well as the Filters & API.
Display Limits Data
You have limited your guests and users, but maybe you would like them to be able to know how much they consume. That is done through the mwai_stats shortcode.
Display what’s left
It’s simple and straight to the point! Let’s display an usage bar of how much the user has consume.
[mwai_stats display="usagebar"]Display the statistics
You can also display the number of units consumed (which are the tokens and number of images – but remember, you can’t calculate the price, units are not linked to the price), the number of queries, the price, etc. Try it:
[mwai_stats display="stats"]By default, it will show everything, but you can enable/disable the fields by doing this:
[mwai_stats display_who="false" display_queries="true" display_units="false" display_price="false" display_usage="false"]Let me know how I can make this better for you 🙂
Settings
Advanced Section
- Debug Mode: Will display extra information in the console.
- Shortcodes: Will resolve the shortcodes when your content is retrieved.
- Dynamic Max Tokens: Let’s say you are using a model that only supports a maximum of 2048 tokens. If you set Max Tokens manually to something higher than this (like 4096), this feature will dynamically takes it down to 2048. In practice, it’s a bit more complex however and this feature will help you with way more issues than just this. Note that it will only reduce the Max Tokens, not make it greater, so you can still use Max Tokens has a limit.
- Context Max Tokens: When a context is added dynamically (through content-aware, embeddings, etc), it will be reduced to fit this number of tokens. This way, you can easily avoid having a gigantic prompt that will kill your number of Max Tokens.
